HDR - friend or foe?
Well, first of all what is HDR photography?
HDR stands for
• HIGH
• DYNAMIC
• RANGE
What that means is that HDR photographs have a high dynamic range.
In other words they have lots of details in all of the light ranges - the very dark shadows to the very bright highlights.
The human eye can detect naturally the differences in brightness and adjust.
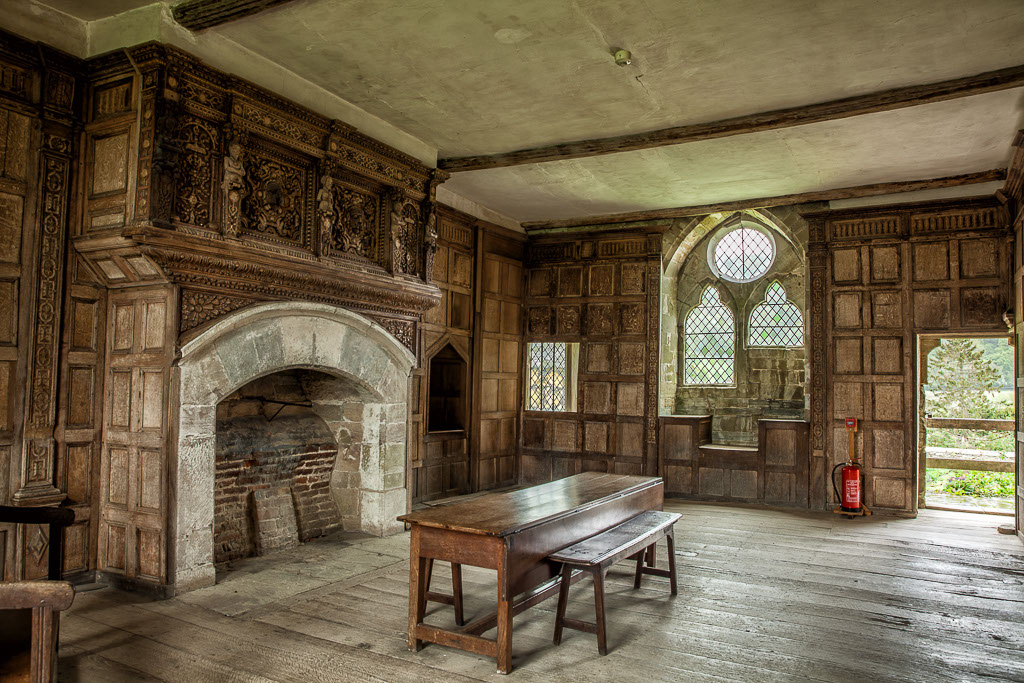
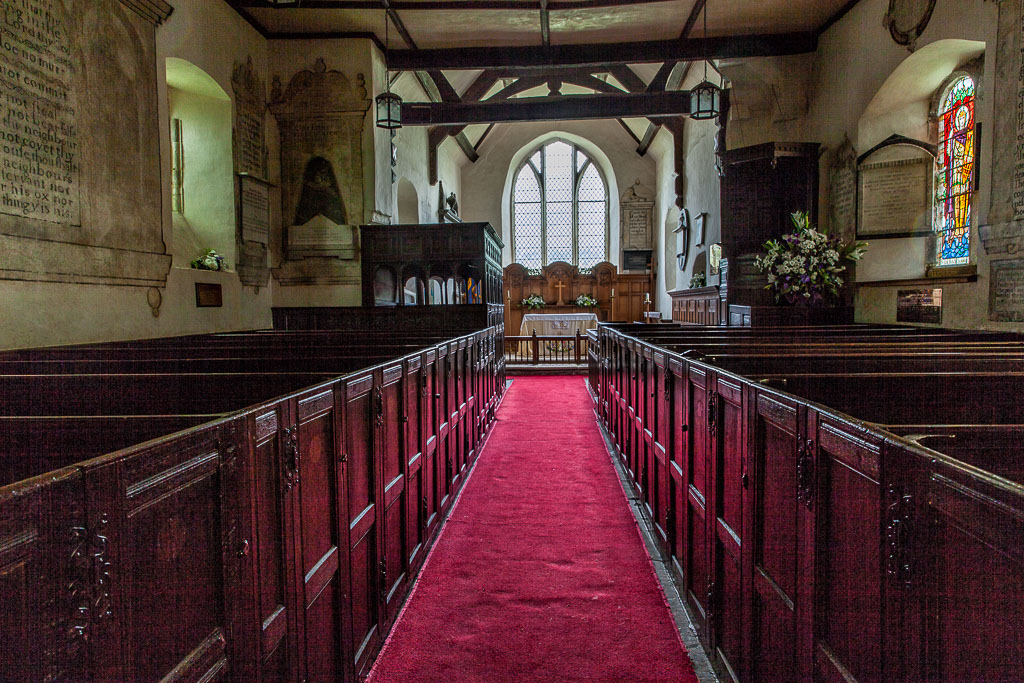
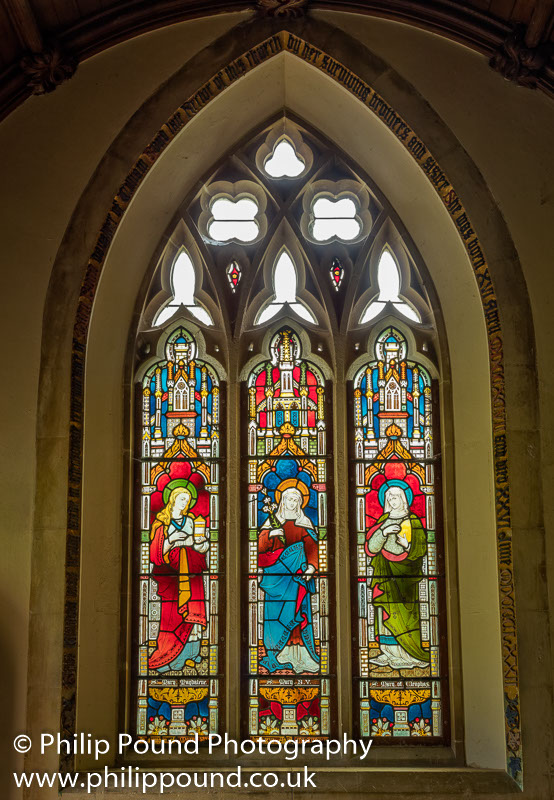
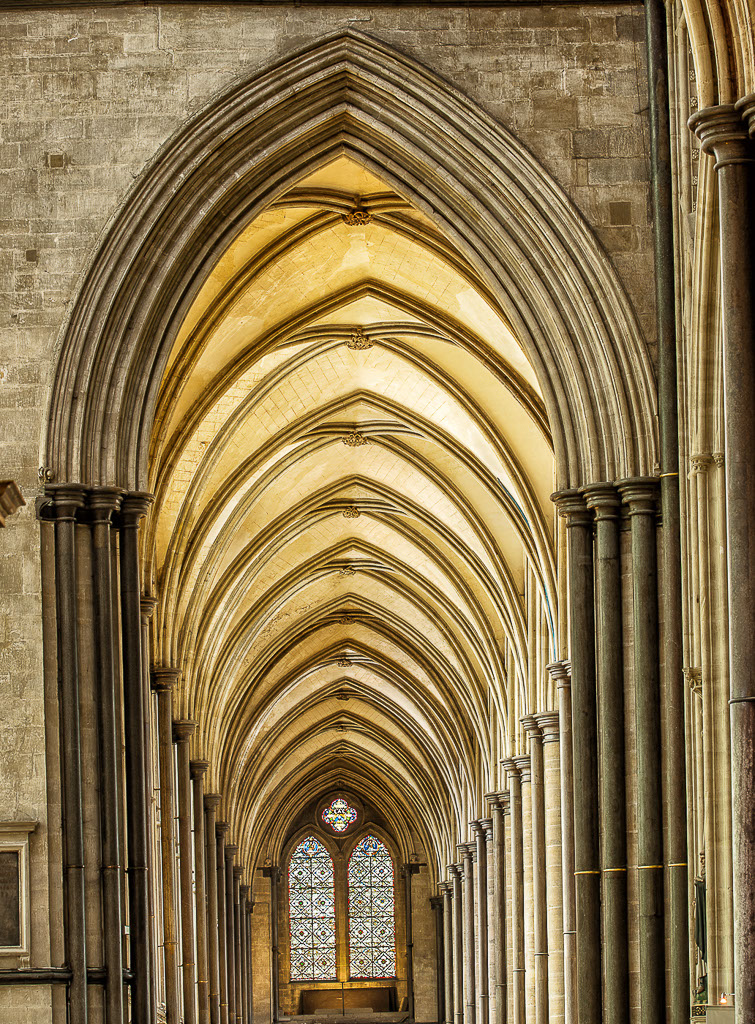
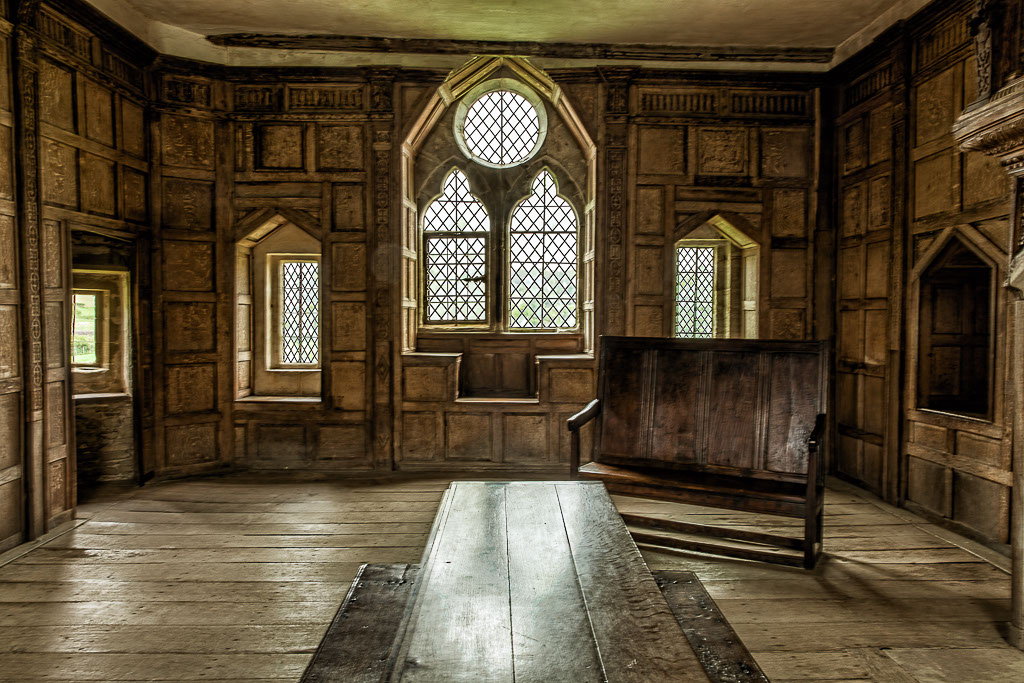
So when we go into, say a church, and see the very bright stained glass windows or the very dark shadow area of the pews, our eyes are able to adjust to both.
We see the detail in both the shadow and bright areas.
Cameras are not so versatile. They measure the amount of light that the camera sees and tend to take an average reading.
Using the spot metering system helps minimise the problem, but it does not get over the overall problem which is that the camera cannot in one single photograph get the reading right for both the bright highlight areas and the dark shadow areas.
HDR photography is one way of getting around the problem.
Graduated neutral density filters.
Using graduated neutral density filters is another way of getting around the problem. Graduated neutral density filters darken part of the image (the brighter part) so that when the camera exposes the brighter part of the image does not look so bright. Various different graduated neutral density filters of different graduations can be combined to ensure that the different levels of brightness and shadow are balanced.
Blending Images
So also is blending in post processing with several different images taken at different exposures a way of getting a final image with detail in the bright and shadow areas.
All three methods have their virtues. Until recently only the graduated neutral density and blended images methods created images that looked photo realistic –
whatever that means!
In this talk I am just going to look at the HDR method to obtain a single image with detail in the shadow and bright areas.
HDR photography is supposedly a marmite type of photography with lots of people either liking it a lot, or lots of people hating it.
Well, in my experience, it is not really like that.
Most amateur photographers hate it.
Most non photographers like it.
Most non photographers probably do not know that it has been created in HDR and probably have no idea what it is.
But they tend to like it, and in my experience, buy it.
You may want to bear that in mind if you want to sell your photographs to people who are not photographers.
And most photographers who in my experience do not like HDR photography, have that view because of the weirder versions of HDR that are out there (and I admit they are very much a personal taste), and because of what earlier versions of post processing software produced.
Software has moved on. Lots of photographers have NOT!
There are hoards of photographers who swear by different software:
1. Photomatrix is a specialist French owned software that creates its own style of HDR photograph.
2. HDR Efex is a Nik Collection (taken over by Google) software that creates its own style of HDR photo.
3. Adobe Photoshop CC and Adobe Lightroom CC also create HDR photographs.
Well, in the earlier versions of Adobe Photoshop some of the HDR photographs created were a bit weird and psychedelic, and left a lot to be desired.
Some of the weirder versions of HDR photographs that photographers hate so much were created in the earlier versions of Photoshop, and that is why so many people interested in HDR turned to Photomatrix and HDR Efex.
I was one of those people.
I own both Photomatrix and HDR Efex software.
I also used the earlier versions of Adobe Photoshop. They all had their limitations but in later versions the HDR photos produced got better and better.
Adobe Photoshop CS6 was a vast improvement on say, Photoshop CS3.
But Adobe Photoshop CS6 still creates weird versions of HDR photographs that do not look realistic and which have that weird look.
The weird look incidentally that non photographers tend to like in their photographs and is very popular. People buy those photographs!
If you do not believe me, go to any market stall selling photographs, and look at what is on sale.
There are some very strange and exaggerated versions of photos created using HDR techniques which are on sale because people buy them. You have been warned!
But Photoshop and Lightroom have moved on a lot since Adobe Photoshop CS6 and Adobe Lightroom 5.
Adobe Photoshop CC and Lightroom CC permit you to create the extreme versions if you want them, but also they let you create photo realistic images which retain all of the shadow and highlight detail, something that, as discussed above, has only, until relatively recently, been achievable using graduated neutral density filters in a single image or multiple exposures from one or more images.
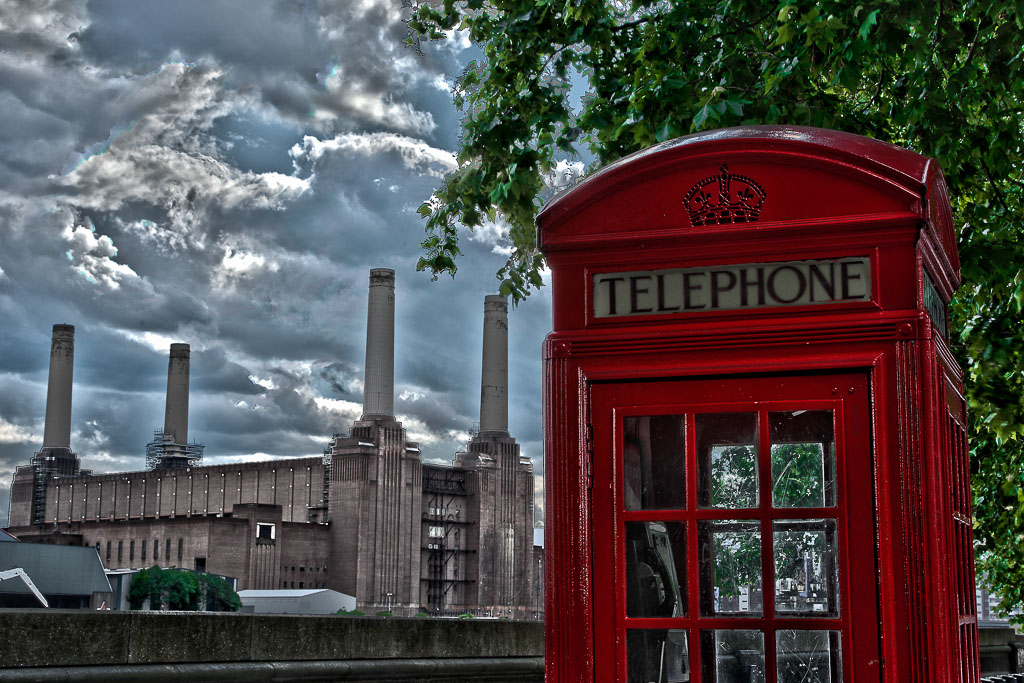
This is an example of an extreme HDR photograph created using Adobe CS5. It was taken a long time ago.
Battersea Power Station from Saarf of the River.
It is a photograph that I took deliberately to sell it. It is very commercial. It has a landmark - Battersea Power Station which I knew one day would be transformed.
This view no longer exists. So, I was right!
And it has the classic red telephone box in it.
Iconic images of London – Battersea Power Station and a Red Telephone Box.
I created an HDR version. The colours are oversaturated – especially the red of the phone box and the green of the trees. The sky looks very strange.
Look carefully at the leaves of the trees and you will see a lack of detail and some of them are transparent. The leaves were moving in the wind and however, good the software is at aligning images and removing ghosts, it has its deficiencies.
It looks unnatural. That is the point.
On a personal level, I do not like the photo.
It has technical imperfections and is weird and psychedelic.
But it has a wow factor for the public.
It is unlike any other photo that they have seen of Battersea Power Station, and that is why people buy it.
That does not make it necessarily a good photo but what is good?
I will tell you what is good.
If you are planning on selling photos, what sells is good!
In this talk, I will be looking at all types of HDR photography.
I will be looking at:
• the weird and wonderful psychedelic type photograph
• the photo realistic type which most people do not even realise is HDR, and
• a mixture which combines both the photo realistic and weird to make something that stands out as being different, but technically is ok – a photo that has been enhanced in post processing.
How to create an HDR Photograph.
So what do you need to do to create an HDR photograph?
Ideally, you need to take 3 bracketed photographs and use a tripod.
You also need a computer that has enough RAM to process three photographs.
The size of the photo will be multiplied by 3 so if you have one of the new Canon 5 DSL cameras with 50 MB for each photo then, by processing 3 photos means that you may be working on a very large file of say, 250 MB when creating an Adobe Photoshop PSD format file.
At best, your computer will be very slow.
At worst, your computer may crash.
I have one of those cameras and am thinking about buying yet another new computer.
8GB of RAM is not enough!
• If your camera has the setting for bracketing set it so that it takes three photographs, one at the correct exposure, one 2 stops underexposed and one 2 stops overexposed.
That should allow for most scenarios. You do not need to take more than 3 photos.
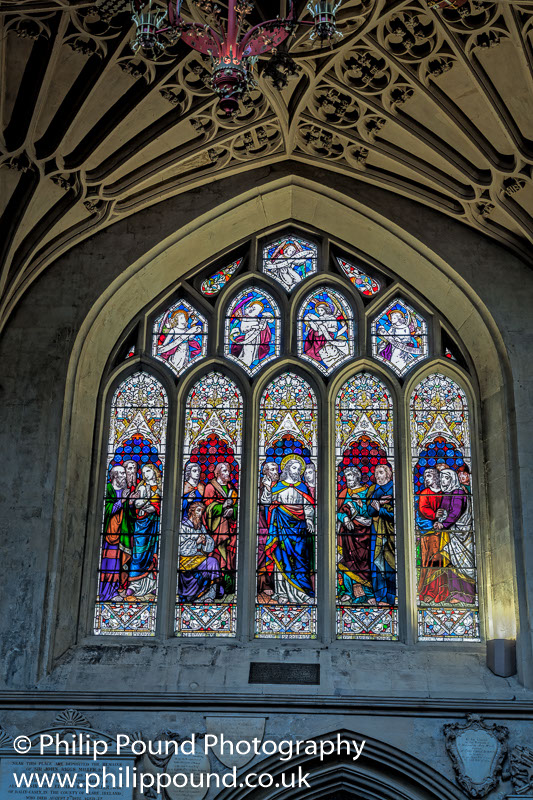
However, in some churches, particularly where the sun is shining on the stained glass windows, you may want to increase the exposure difference to 3 stops and not 2 stops, so one image correctly exposed, one 3 stops underexposed and one 3 stops over exposed.
Windows can be very bright and you need at least 3 stops under exposure to get the detail in the highlights. But the best photos of churches are not taken when the sun is shining. Try to take photos of church interiors on a day when the sun is not shining for the best photos.
• Alternatively, if you are not able to set the camera for automatic bracketing, change the setting after each photo.
• Use a tripod.
• Set the camera on aperture priority and use a wide depth of field - aperture between f/8 and f/11. This avoids distortion that can be created with HDR photographs, and it is usually the sweet spot (the best quality) for most lenses.
• Set the ISO to the lowest (and best quality) setting. This is usually ISO 100.
• Focus manually. Use hyperfocal distance focusing to ensure the maximum depth of field. Focus on a third into the photograph if you do not know the hyperfocal distance for your lens, aperture and camera (the optimum focal point for maximum depth of field). Use MANUAL focusing and turn off any Image Stabilisation.
If you have Live View on your camera, use this to focus accurately manually. Do this at the widest aperture (f/4, f/2.8, f.1.8) and increase the ISO to say 1000. This will give you more light to focus accurately.
Then, without altering the manual focus, turn the aperture back to the optimum aperture (f/8 to f/11) and the lowest ISO (100 ISO?).
• Use a cable release to take the photographs OR, use the 2 second timer shutter on the camera. This avoids any camera shake.
• Make sure that the camera is set to take RAW photos.
• Make sure that the colour balance for the camera is accurate. If you take the photo in RAW you can correct the colour balance in Photoshop or other post processing software. But why make the changes on the computer when you can get it right in camera?
You should have 3 photographs which are identical except for the shutter speed and the exposure.
HDR without a Tripod
If you do not have a tripod you can still take 3 multiple exposure photos.
You will need to focus manually and use aperture priority.
You will need to ensure that the ISO is sufficiently high to avoid camera shake for the underexposed photo.
Software will allow you to auto align photos.
HDR and Moving Objects
It is possible to take photos where there are moving objects but the best photos (and certainly the easiest to create) are those without moving objects. Software will allow you to avoid most of the problems created by moving images with a “Remove Ghosting” setting but most of the time there are issues with this. I recommend that HDR is not used for moving images. However, there are ways to get around the problem which are better (and a lot more time consuming) than clicking a “Remove Ghosting” check box.
It is possible (if you take the photo in RAW) to create an HDR style photograph from one image. That is another way of handling moving images. More about that later, but ideally, you want to use a tripod and take 3 images.
How to Create HDR Weird and Wonderful Photos.
• In Adobe Lightroom CC, highlight the 3 images taken, the underexposed one, the overexposed one and the one correctly exposed.
• Go to Tools.
• Under Photoshop, choose Merge to HDR Pro.
• In the top right hand corner, from the Preset pop-up menu change from Custom. Choose the Scott5 Preset.
• Only click the Remove Ghosts check box if you did NOT use a tripod and if there are moving objects in any of the three photographs. Otherwise, it just takes longer to process the photograph.
• Retain the 16 Bit / Channel setting and do not change the Local Adaptation setting.
Those settings give you an HDR photo that is weird, but not too psychedelic.
You can change the settings for your taste. You can make the photo look even more weird and less photo realistic.
Increasing the Strength slider from left to right makes the photo more weird. The more that you move the slider, the more weird that it looks. I tend not to touch the slider.
I recommend that you turn on the Smoothness check box. That reduces the harshness of the HDR effect.
Moving the Shadow slider to the right increases the lightness in the photograph. How much you need to move the slider depends on how dark the photo is and how much detail you want in the shadow area. It is a matter of personal taste.
Moving the Highlight slider from the right to left reduces the brightness of the brightest parts of the photograph (lights, windows etc.). Moving the Highlight slider to the right obviously brightens the area. Again this is a matter of personal taste.
You may want to increase the Vibrance or Saturation level.
Vibrance is more subtle than Saturation and is a setting that I tend not to touch except to decrease the level. One of the negative aspects of HDR is that photos tend to look oversaturated so if I do touch this setting it is usually to reduce the level. HDR photos tend not to need an increase in colour saturation.
But of course if you are looking for a weirder and more psychedelic type of photo these are the sliders to move to the right.
• Click on OK and the photo opens up in Camera Raw.
Now what you have in Camera Raw is the possibility to make adjustments to the photo as you could with any photo.
The sliders have the same effect. You may wish to change the exposure and darken or lighten the photograph adjusting the Exposure slider.
You can change the colour of the photograph by moving the Colour Temperature slider. Move the slider to the left to make it cooler and more blue. Move the slider to the right to make it more yellow and warmer. It is a question of personal taste.
Move the Contrast slider to the right to add more punch to the photograph.
Move the Highlights slider to the left to decrease the Brightness in areas of brightness such as windows or lights.
Move the Shadows slider to the right to increase lightness in the shadow areas.
Move the White slider to the left to increase the Highlights effect.
Move the Black slider to the right to increase the Shadows effect.
Moving the Clarity slider to the right will increase the mid tone contract. It has a horrible effect on soft items like animals and skin but adds contrast and the wow factor to landscapes, metal and rocks. Anything between 50 and 80 is good for landscapes.
Vibrance and saturation tend to be excessive in HDR photos so it may be appropriate to move these sliders to the left a bit. Vibrance is more subtle than the Saturation slider.
• Click on OK to create a version in Photoshop to be saved under the setting set up for Photoshop - PSD, Tif or Jpeg.
Finally all that is left is to:
• remove any dust sensor spots
• crop and straighten the photograph as appropriate
• correct the colour balance for printing (Adobe RGB or Pro Photo) or screen use (sRGB)
• sharpen the photo.
Heavy sharpening is not usually good for standard photographs but sharpening can extenuate the weird look of HDR and often, for effect, HDR photographs have a lot of sharpening.
HDR Sharpening
Good for HDR Sharpening in Photoshop is the High Pass Tool.
• First Duplicate the Layer in Photoshop - Crtl + J on a PC (Command + J on a Mac)
• Go to Filter and then Other.
• Choose High Pass.
• With the High Pass Filter dialogue open, move the left slider to the left to reveal total grey. Then drag the filter to the right to reveal parts of the photograph that will be sharpened. The more you move the filter to the right, the more that it will be sharpened and you will get the unreal weird HDR effect.
It is all a matter of personal taste.
When you have decided how much to sharpen,
• Go to the Layers panel (short cut F7).
• Change the Blend Mode from Normal to one of the following:
Hard Light for intense and weird sharpening
Overlay for heavy sharpening
Soft Light for medium sharpening.
• Decrease the Opacity level of the Layer from 100% to reduce the sharpening intensity.
If you want even more sharpening for effect just repeat the process.
If you only want the sharpening to apply to certain areas, add a Layer Mask.
Click on Alt and the Add Layer Mask icon at the bottom of the Layers panel. That will add a black mask and NONE of the sharpening will apply.
Choose a white brush (Shortcut B) as foreground colour and with a medium sized white brush paint over the area which you wish to be sharpened. Make sure that you have the Black Mask highlighted when you do it.
You can change the opacity of the brush at the top of the screen to change the degree of sharpening applied. You may for example wish to apply NO sharpening to a background or sky, very little sharpening to fields, and a lot of sharpening to buildings, rocks and cars in the image.
All is a matter of personal taste.
Creating an HDR from one single RAW image.
• Open the image in RAW.
• Move Highlights slider to the far left
• Move Shadows slider to far right
• Move Contrast slider to the far right
• Move Clarity slider to the right
• Then change the panel from Basic (first one) to Effects (seventh from the left) and add some Post Crop Vignetting.
Use the following settings:
Style: Highlight Priority
Amount -20
Midpoint 50
Feather 50.
Other Settings 0
• Click for Open Image.
• In Photoshop duplicate the layer - Ctrl + J in PC (Command + J in Mac).
• Go to Filter, Blur, Gaussian Blur and set the radius to 50 pixels
• Apply 70% opacity in the Layers Panel (Shortcut F7)
• Change Blend Mode from Normal to Soft Light.
• Merge layers - Ctrl + E in PC and Command + E in Mac.
Finally all that is left is to:
• remove any dust sensor spots
• crop and straighten the photograph as appropriate
• correct the colour balance for printing (Adobe RGB or Pro Photo) or screen use (sRGB)
• sharpen the photo with the High Pass Filter.
The single image HDR version has an HDR non photorealistic look to it.
It is not, in my view, as good as images created with three images. However, it does allow you to create an HDR type image if you did not take three images at different exposure settings.
It does allow you to use photographs where there is movement such as a person moving, cars, buses or trains moving, or simply avoid some of the issues that can be created by movement in clouds, grass or leaves.
For Natural Looking HDR Photographs
The above method is to create the traditional weird and psychedelic type fantasy photos.
But it is possible to use the HDR method to create natural looking photographs with all the detail in the shadows and highlights but without looking surreal.
Using Adobe Photoshop CC to process HDR photos
The method uses the full tonality of 32 Bit / Channel images which permits Camera Raw to be used to process photographs with the full range of +10 stops to - 10 stops.
• In Adobe Lightroom CC highlight 3 images - one 2 or 3 stops underexposed, one correctly exposed and one 2 or 3 stops overexposed.
• Go to Photo
• Edit In
• Merge to HDR Pro in Photoshop.
You will see the 3 photographs that will be merged along the bottom of the screen and a large photograph above them. Do not worry. This is not how your final photograph will look.
For more photo realistic photography you need to convert the photos to 32 Bit /Channel.
• In the Mode Pop Up menu choose 32 Bit / Channel. For full tonal range you need to set Adobe Photoshop CC to process the photo in 32 Bit / Channel mode.
• Turn on the Complete Toning in Adobe Camera Raw check box
Do not click the Remove Ghosts check box UNLESS you are using photos that were hand held or have moving objects in them.
• Click Tone in ACR in the bottom right hand corner.
The photos will be merged together and opened as one merged photo in Camera Raw.
You now need to make adjustments in Camera Raw as you would with any photo.
With Camera Raw Open
• Make sure that the Colour Temperature setting is correct.
• Check the exposure of the photograph. You may want to brighten or darken it with the Exposure slider. You have +10 and -10 stops to play with. Increasing brightness increases noise in the shadow areas.
• Increase Contrast and Clarity if you wish to add punch to the photo.
• Move the Shadows and Highlights sliders to affect the bright and dark areas of the photograph (Black can also be used for Shadows and White for Highlights).
• Change the Vibrance level if you want to change the colour saturation in a subtle way. Be careful with Vibrance as over saturation is a negative of HDR photos.
• Change the Saturation level if you want to change the colour saturation in a less subtle way. I only ever use Saturation as a minus to reduce the level of saturation slightly to make the photo look more realistic.
When you have finished making adjusts to Camera Raw
Click on
• Open Image
Your image will now open in Adobe Photoshop CC with a Smart Object layer beneath it. The photo will not look how you want it to end up.
Adobe Photoshop CC does not have full functionality in 32 Bit / Channel mode.
Having set the tonality of the photograph in 32 Bit / Channel mode you need to change this to either 8 Bit / Channel or 16 Bit / Channel mode where Adobe Photoshop CC does have full functionality.
To do this. Click on
• Open Image
• Mode - Change the Mode to 16 Bit / Channel or 8 Bit Channel
A Dialogue will ask you if you want to Merge and flatten the image. You do.
• Click on Merge to flatten the image
You will now see a version of the Adobe Photoshop HDR toning and your image will look very strange. That is normal.
In the Pop Up Menu for Method
• Choose Exposure and Gamma
• Click OK
You now have a normal 16 Bit / Channel or 8 Bit / Channel Photoshop image that you are free to adjust in the normal way. The image will have the full range of tones from the dark shadows to the bright highlights.
But you may want to add some finishing touches. You may want to:
• Crop the image.
• Change the image size
• Apply the Lens Corrections filter to correct distortions.
• Sharpen the image. See above for how to sharpen HDR images with the High Pass Filter and how to use Layer Masks to change which parts of the image are sharpened, and by how much.
Using Adobe Lightroom CC to process HDR photos
Alternatively, you may wish to just use Lightroom CC to process HDR photos.
This is quicker initially and requires less RAM because the HDR image is initially seen in a non destruct mode.
Highlight the three images, one overexposed, one correctly exposed, and one underexposed.
Press Ctrl + H in PC (Command + H in Mac)
This brings up the HDR Merge Preview Dialogue.
It shows a preview photo in the centre of how the HDR photo will look, and on the right HDR Options.
Only Click the Auto Align check box if you took the photos hand held and did not use a Tripod. Clicking this box slows the processing down.
Click the Auto Tone check box as usually this makes corrections which enhance the photo but unclick it to see the effect on the photo in the centre. Usually it looks better with Auto Tone checked. But it is a matter of personal taste. You choose.
There is an area to select for Deghost Amount.
Check for the Ghost Amount. You only need to check this if there are moving images. You can choose between None, Low, Medium and High. Select according to the amount of movement. Ideally you will select NONE.
Click the Show Deghost Overlay Box if you have clicked on either the Low, Medium or High Deghost Amount above. Otherwise leave this check box unchecked.
Click on the Merge button.
This will create another image with the same name is the first of the 3 images settled and the name HDR added. This will normally be shown to the right of the 3 images initially selected.
This will be your dng image (Camera Raw) in 32 Bit / Channel mode which you can now process normally in Camera Raw like a normal dng image. It will just have the full tonality in it.
Make the adjustments that you would normally make.
You may wish to:
Increase Contrast or Clarity.
Adjust the dark and bright areas with the Shadows / Black and Highlights / White sliders
Make automatic Lens Corrections
Reduce Colour and Luminance Noise
Change the Contrast Point Curve from Linear to Medium or High or even Customise it
You may wish to apply Adjustments using the Target Brush Adjustment Tool (short cut K).
There are lots of changes that you can make in the normal way with Camera Raw.
Make the changes and then either take it into another software (Nik Collection, Topaz Labs etc. or straight into Photoshop) for further processing or Export it straight from Lightroom.
It all depends on the ultimate effect that you want.
Nik Collection
Nik Collection has Colour Efex Pro 4 with a Tonal Contrast setting that is very useful for HDR images and adds even more tonal contrast to accentuate the HDR effect. This is very useful for architectural images such as buildings and church interiors.
There are 4 settings: Default, Strong, High Pass and Softening. They each create a different effect. My preference is the Default setting. But HDR photos look good without applying Nik Collection effects.
There is also HDR Efex Pro 2. This has a number of presets and of course the possibility to customise using any one of the presets as a starting point. I tend not to use HDR Efex Pro 2 as it tends to create more of the unusual weird looks.
My preference is to create HDR photo realistic photos.
Topaz Labs
Topaz Labs Clarity is a good plug in for HDR photos.
I use this programme quite a lot for HDR photo realistic photos that I want to which I want to add a wow factor.
I use
Documentary
• Street Scene 1
• Street Scene - Strong Contrast
Architecture
• Brick Building
• Exterior Texture
• Exterior Texture - Smooth
• Interior Strong
I often use them as a starting point and make adjustments to customise the exact effect that I want.
I also use the Topaz Labs Detail plug in which adds even more detail and texture to walls and pavements.
Whichever programme I use I either use the mask within the plug in to restrict the effect to the area of the image that I want to enhance or I use Layer Mask in Photoshop to do the same thing. I prefer Photoshop Layer Masks but it takes up more Computer memory. Some of the HDR file sizes can be huge.
Weird HDR or Photo Realistic HDR?
I have outlined the two methods above to make the HDR photo either very weird or very normal, with options on how to make the photo more or less realistic or weird.
There is a third method which is more subtle and permits you to get the best of all worlds - the wow factor and increased tonality of the HDR photo and the normality and technical perfection of the normal photograph.
This is achieved by combining both the finished HDR photo AND the photo taken at the correct setting (remember we started with three photographs - one under exposed, one correctly exposed and one over exposed. We use the correctly exposed one).
Changing the Blending Mode is One Option
We need to open up both photographs in Photoshop.
The best way is to highlight them in Adobe Lightroom after having made all the necessary Camera Raw adjustments.
Go to
• Photo
• Edit In
• Open as Layers in Photoshop
The photo will open up in Photoshop with two layers. You should be able to see the two layers. If you cannot press the short cut F7 to see the Layers.
Make sure that the regular non HDR image is on the top layer. If it is not, Rename the image from background to Normal by double clicking on the Background layer and typing Normal. Then highlight the layer and move it above the other layer.
If you took the photos using a tripod they should be correctly aligned but just to make sure, highlight BOTH layers and then click on
Edit
Auto - Align Layers.
Make sure that the Auto button is clicked under Projection
Do not click on any of the other settings
Click on the top layer named Normal to make it an active layer.
With the Blend Mode at Normal in the Layers panel change the Opacity from 100% to a lower amount.
The amount of Opacity you select depends on how "normal" and "photorealistic" you want the photo. 65% will give you a mainly normal look. 20% will give you a mainly HDR look. It is your call.
You can then flatten the image and in Camera Raw make some further adjustments. Adjust Shadows, Contrast, Highlights and Clarity a little to add a little punch.
And then
Add Vignetting
Sharpen using High Pass Sharpening
Another Option is Use a Layer Mask
This is the best method and creates the most natural photographs. It is also the most time consuming.
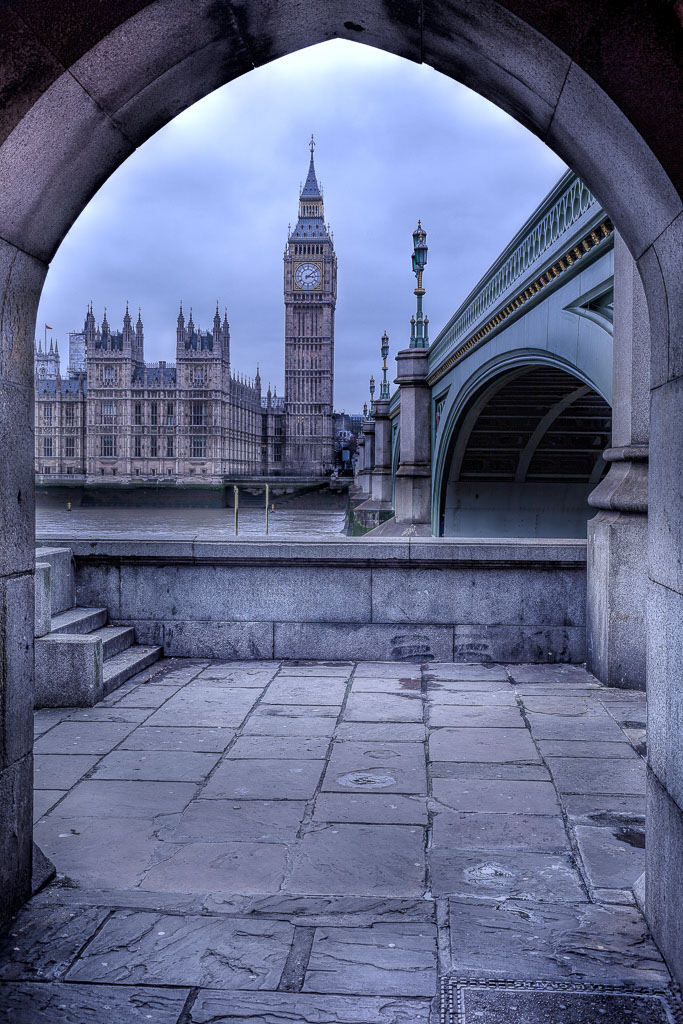
It is the method that I used to create my photograph of Big Ben which has been used as a greeting card and has been a best seller. The photograph has a wow factor which HDR creates but it also looks natural.
It was a photo selected by the judge for comment in the 2014 KCPA Competition. It scored well. The judge did not notice that HDR had been used to create the effect.
Not only is it in my view the best method to create natural looking photos, but it is also the method to use if you have movement in the photos used to create the HDR photo.
You need to understand how Layer Mask work. Black conceals and white reveals.
So if we have the standard Normal photograph in the Layers panel on top of the HDR photo and click Alt whilst holding the Add Layer Mask icon we get a black layer mask.
Black conceals so we will see nothing of the HDR layer below.
If we paint on the Black Layer Mask using a white brush, it will reveal the layer below.
If we select B for Brush and reduce the Opacity on the top layer in Photoshop from 100% to a lower amount, the amount of the layer below revealed will be more subtle.
We can use harder and softer brushes, bigger and smaller brushes, and change the level of opacity for greater subtlety.
We can decide how much of the layer below (the HDR version) we want to reveal.
With moving objects and moving people, we would show none of the HDR part below where they are present.
When I created the original HDR version of the Big Ben photo it had the classic technical failings of HDR of:
Being Oversaturated and looking unnatural
Having halos near the edges of hard objects. In the case of this photo around the arch, the bridge and Big Ben
Chromatic aberrations in the form of cyan and magenta lines next to the halos.
Chromatic aberrations are quite common when there is some form of backlighting near a hard surface such as an arch or wall. They can be removed in software but the HDR process tends to accentuate them.
I created a normal PSD version of the photo in Adobe Photoshop using the correctly exposed version of the photograph. I made sure that the colour balance was the same as the HDR version. I placed that photo in a layer above the HDR version. With a Black Layer Mask I selected a very small soft white brush and painted very carefully over the Black Mask in white in the areas where there were halos and chromatic aberration. This revealed the original photograph without those defects.
When I was satisfied that I had removed all the technical defects from the HDR version I merged the Layers (Ctrl + E in PC) to create a merged version which looked like an HDR version but did not have the defects.
I created another layer (Ctrl + J in PC) and added a very small amount of noise to that layer so that the area changed (painted in with the white brush would not notice).
In Adobe Photoshop CC
• Filter
• Noise
• Add Noise
• Setting 0.5% Gaussian and Monochromatic
I then added a Black Layer Mask in the way described above, and painted with a small white soft brush over the area where the original changes had been made. This was not done as delicately as the original painting as it was not necessary.
The effect of the increased detail on the pavement and stonework of the arch was achieved by high levels of clarity specifically in those areas. Masks were used to mask out the areas that did not require such a high level of clarity.
Topaz Labs Detail was used in Micro Enhancement II and the other areas masked out in Adobe Photoshop. Clarity in Photoshop repeated could have achieved a similar effect.
Copyright Philip Pound LRPS
Credits:
Philip Pound